How to log onto the ARC computing system
1.Install VPN
For users that want to use the ARC system off campus, a VPN is needed. Check out how to install and use the software through this website (they provide very detailed instructions and videos): VT4help. All different systems (Linux, MacOS and Windows) are supported. Make sure you connect to the VPN before logging onto the computing system when you are off campus.
2.Mac users login
Open your terminal software (in launchpad → other).
Login by ssh commands listed below. Our university’s supercomputing system has three available servers: Newriver, Cascades, and Tinkercliffs. You can log into any one of them to get access to your data since they are sharing the same storage.
Newriver: ssh -Y #yourid#@newriver1.arc.vt.edu OR
ssh -Y #yourid#@newriver2.arc.vt.edu
Cascades: ssh -Y #yourid#@cascades1.arc.vt.edu OR
ssh -Y #yourid#@cascades2.arc.vt.edu
Tinkercliffs: ssh -Y #yourid#@tinkercliffs1.arc.vt.edu OR
ssh -Y #yourid#@tinkercliffs2.arc.vt.edu
Then press Enter you will be asked to type in your password which is your VT account password (not your network password). Nothing will show up when you type in your password but the system will recognize it, just make sure it’s correct and then press Enter. Prepare your phone’s DUO app ready with you since you will need a 2-step authentication.
Use this format since the 2-step authentication: mypassword,push (See https://arc.vt.edu/2fa/). After typing in your password, press Enter and your DUO app will ask you for authorization.
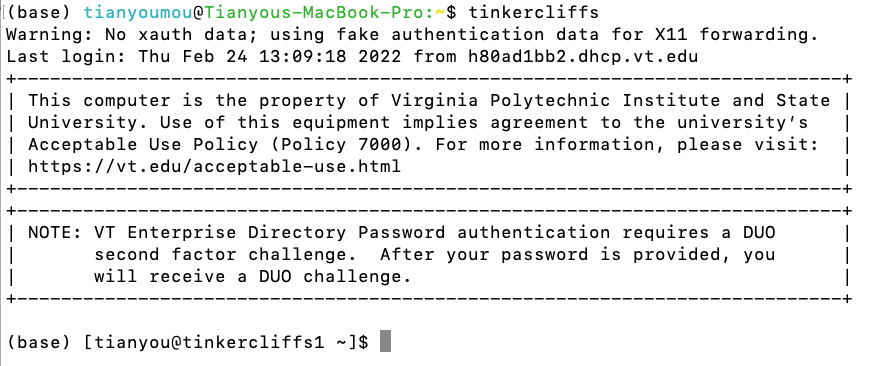
After the authorization, you will enter one of the arc computing systems successfully which looks like this:
3.Windows users login—By Installing SSH client
After installing the Pulse Secure software, a Secure Shell (SSH) software is needed to enable you to connect to the arc server. If you are using a Windows machine, you will need to download an SSH client, such as PuTTY or the SSH Secure Shell Client.
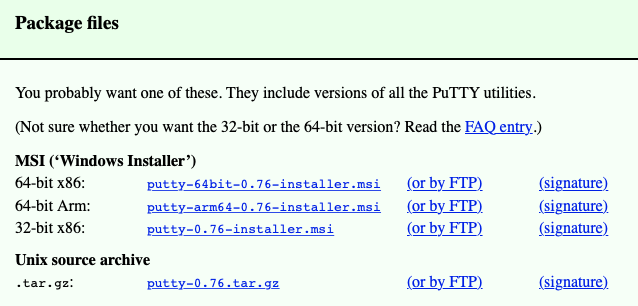
Here I give an instruction on how to use PuTTY as an example. Go to the website of PuTTY and download. Then choose the 64 bit windows version.
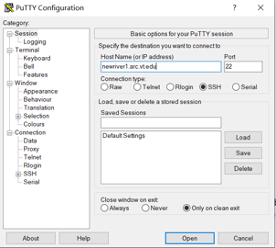
Follow the regular instructions and install the putty software. Then in the start menu you will the putty software and open it, a window will prompt out like this:
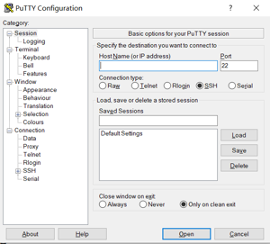
At the Host Name session, write into the server address. Available servers and addresses are listed below. Our university’s supercomputing system has three available servers: Newriver, Cascades, and Tinkercliffs. You can log into any one of them to get access to your data since they are sharing the same storage.
Newriver: newriver1.arc.vt.edu OR newriver2.arc.vt.edu
Cascades: cascades1.arc.vt.edu OR cascades2.arc.vt.edu
Tinkercliffs: tinkercliffs1.arc.vt.edu OR tinkercliffs2.arc.vt.edu
Try Newriver first and for all servers try suffix 1 first, and if suffix 1 is not working then try suffix 2. In most cases suffix 1 will work.
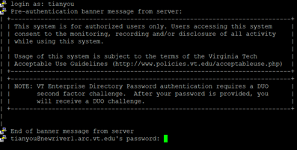
Then you press open to turn on the SSH (Maybe a security alert window will prompt out and you just choose no.) and you will see ‘login as’

Write into your arc account username. You can easily find it from the coldfront.arc.vt.edu website.
Then you will be asked to type in your password which is the same as your vt account password (not network password). Prepare your phone’s DUO app ready with you since you will need a 2-step authentication. After typing in your password, press Enter and your DUO app will ask you for authorization.
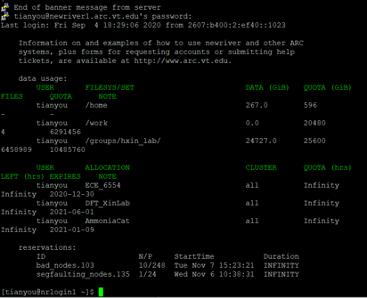
After this, you will enter the server file system finally.
4.Generate a ssh key for quick login next time.
(1). Generate keys
In your local terminal:
- Press [ENTER] key —- accept the default location. The ssh-keygen utility prompts you for a passphrase.
- Press [ENTER] key —- accept the default (no passphrase). Or you can type in a passphrase.
- Press [ENTER] key —- Continue to leave it empty. Or you can enter the passphrase a second time to continue.
- After you confirm the passphrase, the system generates the key pair (private and public keys)
(2). Check saved keys
Your identification has been saved in /Users/myname/.ssh/id_rsa.
Your public key has been saved in /Users/myname/.ssh/id_rsa.pub.
Your private key is saved to the id_rsa file in the .ssh directory.
The key fingerprint is:
ae:89:72:0b:85:da:5a:f4:7c:1f:c2:43:fd:c6:44:38 myname@mymac.local
The key’s randomart image is:
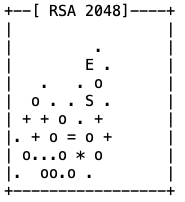
(3). Save your public key to the server
Go to id_rsa.pub file you generated just now to copy your public key. (Remember to copy everything)
Login to your server account.
Go to ~/.ssh folder and open authorized_keys file.
paste your public key to this file.
Save the file.
Refer to this website for more explanations.
https://docs.joyent.com/public-cloud/getting-started/ssh-keys/generating-an-ssh-key-manually/manually-generating-your-ssh-key-in-mac-os-x
Setting up working environments:
It’s better to compile VASP first for some steps to be working. For this instruction, make sure you copy the right files from the right directory. ‘/path/to’ means you have to replace it with the specific path in your own account.
1.[./] First setup Miniconda3 environment.
./ directory here can be your home directory:
You can make a new directory to put all packages in:
2.[./usr] Copy and paste Miniconda3 package from:
cp /work/common/hxin_lab/hxin/Installation/Miniconda3-latest-Linux-x86_64.sh ./
3.[./usr] Compile Miniconda3:
bash Miniconda3-latest-Linux-x86_64.sh
By default Miniconda3 will be installed to your home directory, you can change the path to during the installation process. For example, you can change it to:
/home/youruserid/usr/miniconda3
4.[./usr] After setting up miniconda3, you can set up some ASE environments:
You can copy and paste the whole folder for specific versions of ASE to the usr directory.
cp -r /work/common/hxin_lab/hxin/Installation/ase-3.17.0 ./
cp -r /work/common/hxin_lab/hxin/Installation/ase-3.19.0 ./
cp -r /work/common/hxin_lab/hxin/Installation/ase-3.15 ./
5.[./] Setup priviatemodules
mkdir priviatemodules; cd priviatemodules
cp -r /work/common/hxin_lab/hxin/Installation/priviatemodules/* .
6.[./priviatemodules] Change paths for VASP modules. For this step, you have to compile VASP first, following another instruction for VASP compilation.
cd vasp_l; emacs 5.4.4-vtst
Change all paths to your own paths:
append-path PATH /path/to/vasp_suite/src/vasp.5.4.4/bin
setenv VASP_PP_PATH /path/to/vasp_suite/lib
setenv VASP_SCRIPT /path/to/priviatemodules/ase_vasp/run_vasp.py
7.[./priviatemodules] Change paths for ASE modules.
Change all paths to your own paths:
append-path     PATH    /work/tianyou/usr/ase-3.19.0/ase-3.19.0/bin
append-path     PYTHONPATH    /work/tianyou/usr/ase-3.19.0/ase-3.19.0
Change all paths to your own paths:
append-path     PATH    /work/common/hxin_lab/hxin/cascades/usr/ase-3.17.0/ase-3.17.0/bin
append-path     PYTHONPATH    /work/common/hxin_lab/hxin/cascades/usr/ase-3.17.0/ase-3.17.0
Change all paths to your own paths:
append-path     PATH    /home/hxin/cascades/usr/ase-3.15/bin
append-path     PYTHONPATH   /home/hxin/cascades/usr/ase-3.15/lib/python2.7/site-packages
8.[./] Script
cp -r /work/common/hxin_lab/hxin/Installation/Script .
9.[./] Setup .modules.
Copy .modules files which contain modules for VASP running and need to be sourced every time before you want to use VASP.
cp /work/common/hxin_lab/hxin/Installation/modules/* .
ls -A will show hidden files in this directory
Edit .modules.vasp-vtst3 file and change the miniconda3 path:
module purge
module reset

module load VASP
module unload VASP/5.4.4-intel-2019b
module load vasp_l/5.4.4-vtst
module load ase/3.19

export PATH=“/path/to/miniconda3/bin:$PATH"
10.[./] Setup .bashrc
alias cdw="cd /work/$(whoami)"
alias ag="ase gui"

export PATH=/path/to/Script:$PATH
export PYTHONPATH=/path/to/Script:$PYTHONPATH
export PATH=/path/to/Script/vtst:$PATH
export PYTHONPATH=/path/to/Script/vtst:$PYTHONPATH

export MODULEPATH=/path/to/priviatemodules:$MODULEPATH
11.[./] Conda install numpy, scipy
Install necessary packages for conda:
source ~/.bashrc
source /path/to/.modules.vasp-vtst3

Install numpy: conda install -c anaconda numpy

Install scipy: conda install -c anaconda scipy
For other unnecessary packages, you can search conda installation commands on google.
12.[./] Test with your Script.py and ASE GUI to see if all modules work or not.
13.[./] Every time you want to use VASP you have to type:
source /path/to/.modules.vasp-vtst3
For convenience you can also add this command to ~/.bashrc.
VASP Compilation
For this instruction, make sure you copy the right files from the right directory. ‘/path/to’ means you have to replace it with the specific path in your own account.
1.[./] First generate vasp folder as the root folder:
For tinkercliffs, you can make it in the $WORK directory:
cd $WORK; mkdir vasp_suite
For a more systematic way, you can put vasp suite into the usr directory by:
cd $WORK; mkdir usr; cd usr; mkdir vasp_suite
Or compile it in the /home directory which can be used for all three servers.
2.[./vasp_suite] Generate vasp lib folder to save pseudopotential files:
3.[./vasp_suite/lib] Download pseudopotential files you need, for instance: potpaw_LDA.52.tar.gz and potpaw_PBE.52.tar.gz. This is for the ase interface binary.
You can go to this folder to copy the pseudopotential source package:
/work/common/hxin_lab/hxin/Installation
For tinkercliffs, you can firstly copy and paste everything to your home directory:
Login cascades, and then:
cp -r /work/common/hxin_lab/hxin/Installation ~
Then next time when you are on the tinkercliffs, you can copy from:
cp ~/Installation /path/to/where/you/want
4.[./vasp_suite/lib] Tar files:
tar -xvf potpaw_LDA.52.tar.gz ; tar -xvf potpaw_PBE.52.tar.gz
More info about tar command:
https://www.freecodecamp.org/news/tar-in-linux-example-tar-gz-tar-file-and-tar-directory-and-tar-compress-commands/
This command will tar your .gz files and generate folders saving pseudo potentials
5.[./vasp_suite] Go back to the vasp_suite root folder and make another source folder:
6.[./vasp_suite/src] Go to src folder and download the vasp package: vasp.5.4.4.tar.gz
You can go to this folder to copy the vasp source package:
/work/common/hxin_lab/hxin/Installation
7.[./vasp_suite/src] Same way to tar this .gz file:
tar -xvf vasp.5.4.4.tar.gz
8.[./vasp_suite/src/vasp.5.4.4] Then go to the generated vasp.5.4.4 folder and such folders and files are in this folder:
arc bin build makefile README src
9.[./vasp_suite/src/vasp.5.4.4] Copy one of the makefile.include.arch files in ./arch to ./makefile.include. Take one that most closely reflects your system (hopefully). For instance, on a linux box with the Intel Composer suite:
cp arch/makefile.include.linux_intel ./makefile.include
You can go to this folder to copy the makefile I’ve made:
/work/common/hxin_lab/hxin/Installation
For the tinkercliffs server, use this one instead:
/work/common/hxin_lab/hxin/Installation/tinkercliffs
10.[./vasp_suite/src/vasp.5.4.4] So right now we have this makefile.include file and then we need to set it up.
11.[./vasp_suite/src/vasp.5.4.4/] Add beef to vasp. Copy and paste the beef folder:
cp -r /work/common/hxin_lab/hxin/Installation/beef ./
Change BEEF tag in the makefile.include file to :
BEEF = -L/path/to/vasp_suite/src/vasp.5.4.4/beef/lib -lbeef
Save and exit the makefile.include file.
12.[./vasp_suite/src/vasp.5.4.4/src] After setting up the makefile, for vtsttools installation, another several steps need to be done(No need if you don’t use VTST tools). Go to src folder under vasp.5.4.4:
cd ./vasp_suite/src/vasp.5.4.4/src
13.[./vasp_suite/src/vasp.5.4.4/src] In this folder, edit main.F file to find and replace (using ctrl+s for quick search):
CALL CHAIN_FORCE(T_INFO%NIONS,DYN%POSION,TOTEN,TIFOR, &
     LATT_CUR%A,LATT_CUR%B,IO%IU6)
with
CALL CHAIN_FORCE(T_INFO%NIONS,DYN%POSION,TOTEN,TIFOR, &
     TSIF,LATT_CUR%A,LATT_CUR%B,IO%IU6)
14.[./vasp_suite/src/] Backup your chain.F since vtsttools also has one. Go back to the upper folder and make a backup folder.
cd ./vasp_suite/src/ ; mkdir backup ; cd backup
cp ./vasp_suite/src/vasp.5.4.4/src/chain.F ./
15.[./vasp_suite/src/] Download source codes of vtsttools by this command (using svn checkout):
svn co http://theory.cm.utexas.edu/svn/vtsttools
Or directly copy from directory:
cp -r /work/common/hxin_lab/hxin/Installation/vtsttools ./
A vtsttools folder will be generated and contains 3 subfolders:
16.[./vasp_suite/src/vasp.5.4.4/src] Go to vasp.5.4.4/src folder, copy and paste all source codes from vtsttools which are inside of vtstcode folder:
cd ./vasp_suite/src/vasp.5.4.4/src
cp ./vasp_suite/src/vtsttools/vtstcode/* ./
17.[./vasp_suite/src/vasp.5.4.4/src] At the same folder, edit .objects file to change vasp source codes. Better way is to directly copy from
/work/common/hxin_lab/hxin/Installation/tinkercliffs/src/.objects
emacs .objects (or any tools available to you to edit the file)
add the following objects before chain.o:
bfgs.o \
dynmat.o  \
instanton.o  \
lbfgs.o \
sd.o  \
cg.o \
dimer.o \
bbm.o \
fire.o \
lanczos.o \
neb.o  \
qm.o \
opt.o \
Make sure you delete all spaces after ‘\’ and then press ‘Enter’.
Save and exit the .objects file.
18.[./vasp_suite/src] Download VASPsol from github for solvation calculations.
git clone https://github.com/henniggroup/VASPsol.git
19.[./vasp_suite/src] Change solvation source code:
cp ./VASPsol/src/solvation.F ./vasp.5.4.4/src/
20.[./vasp_suite/src/vasp.5.4.4] Make sure you add -Dsol_compat option to the list of precompiler options (CPP_OPTIONS) in the makefile.include

For the makefile.include file copied directly from the Installation folder, you don’t need to make any changes.
21.[./vasp_suite/src/vasp.5.4.4/] The last step is the actual compilation of VASP:
On newriver:
module purge; module load intel/15.3; module load openmpi/1.8.5; module load mkl
On cascades:
module purge; module load intel/15.3; module load openmpi/2.0.0; module load mkl
On tinkercliffs:
Then:
If you are encountering any errors, go to step 24 for some possible solutions.
After successful compilation, three binaries of vasp can be found in “./vasp_suite/src/vasp.5.4.4/bin”, namely the standard full k-point version “vasp_std”, the gamma-only version “vasp_gam” and the non-collinear version “vasp_ncl”.
22.Running vasp in parallel with, say 4 MPI ranks, is done using
mpirun -np 4 /path/to/vasp_std
Remember to set up all dependencies before running VASP.
23.[./vasp_suite/kernel] Make another directory for the vdw kernel.
cd ./vasp_suite; mkdir kernel
cp /work/common/hxin_lab/hxin/Installation/kernel/vdw_kernel.bindat ./
24.Potential Errors:
(a).If you get some errors like the screenshot below, you probably didn’t delete all spaces in step 17. Better to directly copy and paste the right one.

(b). If you get some errors like the screenshot below, you’ll probably need to set up your locale:
Edit your local bash_profile by opening a new terminal window and type: emacs ~/.bash_profile
Add the following two lines to it and save.
export LC_ALL=en_US.UTF-8
export LANG=en_US.UTF-8

For more installation details check out the websites listed below.
https://www.vasp.at/wiki/index.php/A_CentOS_based_installation_of_VASP
https://cms.mpi.univie.ac.at/vasp/vasp/vasp.html
https://theory.cm.utexas.edu/vtsttools/installation.html
https://github.com/henniggroup/VASPsol
Quantum Espresso Compilation
1.[./] Make a new folder for q-e 6.5,
2.[./espresso6.5] Go to espresso6.5 folder, and download q-e 6.5 package from Github (https://github.com/QEF/q-e) by typing command:
git clone https://github.com/QEF/q-e.git
Or directly copy from here:
cp -r /work/common/hxin_lab/hxin/cascades/usr/esp-6.5/q-e .
3.[./espresso6.5/q-e] A new folder q-e will be made and go to the q-e folder:
cd q-e

module purge

module reset

module load VASP
4.[./espresso6.5/q-e] For a quick installation we just use :
./configure [options]
make all
5.[./espresso6.5] Prepare the pseudopotential folder which contains all needed pseudopotential for quantum espresso to use.
An example folder is
/home/hxin/cascades/usr/esp-psp
Copy and paste esp-psp folder and add path to
export ASE_ESPRESSO_COMMAND="/home/hxin/cascades/usr/esp-6.5/q-e/bin/pw.x -in PREFIX.pwi > PREFIX.pwo"
Binaries go in bin/. For more information, see the general documentation in directory Doc/, package-specific documentation in ‘*/Doc/’.
User manual: https://www.quantum-espresso.org/Doc/user_guide.pdf
Error: https://lists.quantum-espresso.org/pipermail/users/2020-July/045079.html
Libxc: https://gitlab.com/libxc/libxc
Tianyou Mou
Chemical Engineer and Data Scientist

Comments